Vue 3 + Typescript + Vite项目创建
943人浏览 / 0人评论
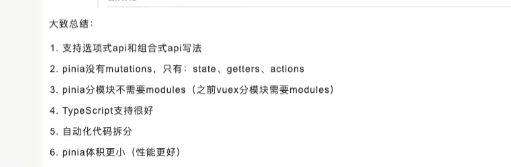
pinia和vuex区别
创建项目
npm create vite@latest
输入项目名称
选择框架(Vue)
选择业务处理语言(Ts)
创建完成
安装依赖
cd 项目路径
npm install vue-router #路由插件
npm install pinia #状态管理插件
npm install element-plus #前端组件插件
npm install -D amfe-flexible autoprefixer postcss-pxtorem #屏幕适配插件
npm install -D sass node-sass sass-loader style-loader #scss插件
npm install -D unplugin-auto-import #自动导入插件
创建目录

api接口配置目录layout项目结构-布局文件夹router路由-文件夹store存放vuex-文件夹styles全局样式-文件夹utils全局工具函数-文件夹views放置页面-文件夹
1.router下创建index.ts
//index.ts
import { createRouter, createWebHashHistory, RouteRecordRaw } from "vue-router";

const routes: RouteRecordRaw[] = [
  {
    path: "/",
    name: "Home",
    component: () => import("../views/home.vue"),
  },
];

const router = createRouter({
  history: createWebHashHistory(), // 哈希模式
  routes,
});

export default router;
2.store下创建index.ts
import { defineStore } from 'pinia';


const useStore = defineStore('storeId', {
    state: ()=> {
        return {
            counter: 0,
        }
    },
    getters: {},
    actions: {}
})

export default useStore
3.views下创建home.vue
<template>
    <div>
        <span>hello world</span>
    </div>
</template>

<script setup lang="ts">

</script>

<style scoped>

</style>
4.修改App.vue
<template>
	<router-view />
</template>

<style>
</style>
5.修改main.ts
import { createApp } from 'vue'
import './style.css'
import App from './App.vue'
import router from "./router";//配置路由
import { createPinia } from 'pinia';
import "amfe-flexible/index.js";
import ElementPlus from 'element-plus'
import 'element-plus/dist/index.css'

const app = createApp(App);

app.use(router).use(createPinia).use(ElementPlus).mount("#app");
6.根目录创建postcss.config.cjs
//postcss.config.js
module.exports = {
    plugins: {
      autoprefixer: {
        overrideBrowserslist: [
          "Android 4.1",
          "iOS 7.1",
          "Chrome > 31",
          "ff > 31",
          "ie >= 8",
          "last 10 versions", // 所有主流浏览器最近10版本用
        ],
        grid: true,
      },
      "postcss-pxtorem": {
        rootValue: 192, // 设计稿宽度的1/ 10 例如设计稿按照 1920设计 此处就为192
        propList: ["*", "!border"], // 除 border 外所有px 转 rem
        selectorBlackList: [".el-"], // 过滤掉.el-开头的class,不进行rem转换
      },
    },
  };
7.修改vite.config.ts
//vite.config.ts
import { defineConfig } from "vite";
import vue from "@vitejs/plugin-vue";
import AutoImport from 'unplugin-auto-import/vite'
import { resolve } from "path"; //配置别名路径
// https://vitejs.dev/config/
export default defineConfig({
  plugins: [
    vue(),
    AutoImport({
      imports: ["vue", "vue-router"], //自动引入vue的ref、toRefs、onmounted等,无需在页面中再次引入
      dts:"src/auto-import.d.ts" // 生成在src路径下名为auto-import.d.ts的声明文件
    }),
  ], // 注册插件
  server: {
    // open: true,//启动项目后自动打开浏览器
    port: 8080, //端口配置
    hmr: true, //开启热加载.
    // proxy:{
		// 	'/api':'http://testapi.xuexiluxian.cn'
		// }
  },
  resolve: {
    //设置便捷图片路径引用
    alias: {
      "/images": "src/assets/images/", //这里不能通过path模块解析路径的写法
      "@": resolve(__dirname, "src"),//配置别名路径
      "@c": resolve(__dirname, "src/components"),//配置别名路径
    },
  },
  //项目构建配置
  build: {
    target: "modules", //设置最终构建的浏览器兼容目标  //es2015(编译成es5) | modules
    outDir: "dist", // 构建得包名  默认:dist
    assetsDir: "assets", // 静态资源得存放路径文件名  assets
    sourcemap: false, //构建后是否生成 source map 文件
    minify: "esbuild", // 项目压缩 :boolean | 'terser' | 'esbuild'
    chunkSizeWarningLimit: 1000, //chunk 大小警告的限制(以 kbs 为单位)默认:500
    cssTarget: "chrome61", //防止 vite 将 rgba() 颜色转化为 #RGBA 十六进制符号的形式  (要兼容的场景是安卓微信中的 webview 时,它不支持 CSS 中的 #RGBA 十六进制颜色符号)
  },
  // 样式全局配置
  css: {
    // 全局变量+全局引入less+配置主题色
    preprocessorOptions: {
      less: {
        javascriptEnabled: true,
        // 全局变量使用:@primary-color
        modifyVars: {
          "primary-color": "#1890ff", // 全局主色
          "link-color": " #1890ff", // 链接色
          "success-color": " #52c41a", // 成功色
          "warning-color": " #faad14", // 警告色
          "error-color": " #ff4d4f", // 错误色
          "font-size-base": " 14px", // 主字号
          /*light浅色背景下*/
          "light-headline": "#262626", // 标题色
          "light-text": "#595959", // 主要文字
          "light-text-secondary": "#8c8c8c", // 次要文字
          "light-disabled": "#bfbfbf", // 禁用
          "light-border": " #d9d9d9", // 边框色
          "light-cut-off-rule": " #f0f0f0", // 分割线
          "light-bg": " #f5f5f5", // 背景
          "light-table-headline": " #fafafa", // 表格标题
          /*dark深色背景下*/
          "dark-headline": "#262626", // 标题色
          "dark-text": "#595959", // 主要文字
          "dark-text-secondary": "#8c8c8c", // 次要文字
          "dark-disabled": "#bfbfbf", // 禁用
          "dark-border": " #d9d9d9", // 边框色
          "dark-cut-off-rule": " #f0f0f0", // 分割线
          "dark-bg": " #f5f5f5", // 背景
          "dark-table-headline": " #fafafa", // 表格标题
          /*边框配置*/
          "border-radius-base": " 2px", // 组件/浮层圆角
          "box-shadow-base": " 0 2px 8px rgba(0, 0, 0, 0.15)", // 浮层阴影
        },
      },
    },
  },
});
8.vscode 开发插件
volar(Vue Language Features) :代码高亮以及语法支持
Vue VSCode Snippets:生成 Vue 代码片段
输入提示词:vbase 就会提示生成的模版内容,vfor 就会提示for循环的模板


全部评论